Saturday, 10 February 2018

February 2018 meeting

 Andy, Alistair, Simon, Graham and Gordon met at Alisdair's in Glasgow this month. There were a few models to look at: Simon had painted the Severn Models kits he started last month:


Nice interior detail:


and the Buchanan Kits Caley goods brake:


 Andy had a go at a Buchanan Kits lattice-post signal this month. It was quite exacting to put together but the instructions were clear. He didn't claim it to be a perfect build, but said he'd learned a great deal for the next one! The finial is a work in progress. And, yes, the signal operates.


The demo this month was from Alisdair, who has been continuing to detail the sewage works destined for Tony Heywood's Hest Bank. He wanted a quick and effective way to fabricate the distinctive post-and-rail safety fences and ladders around the filter beds and the various tanks.


Rather than go the etch route, he decided to use copper wire from old GPO four-core phone cable, stripped of insulation and stretched straight with pliers. A simple jig was made by skrawking two parallel grooves into a piece of aluminium for the fence rails, with a series of short grooves at right angles to these for the posts.


A length of wire, destined to be the middle fence rail, was aligned in the groove and held in place with "hot tape", then a fine file was used to cut a notch half-way through it at each post position.


A notch was also made in a length of wire destined to become a post.


This was then trimmed with a scalpel roughly to post height, erring on the generous side.

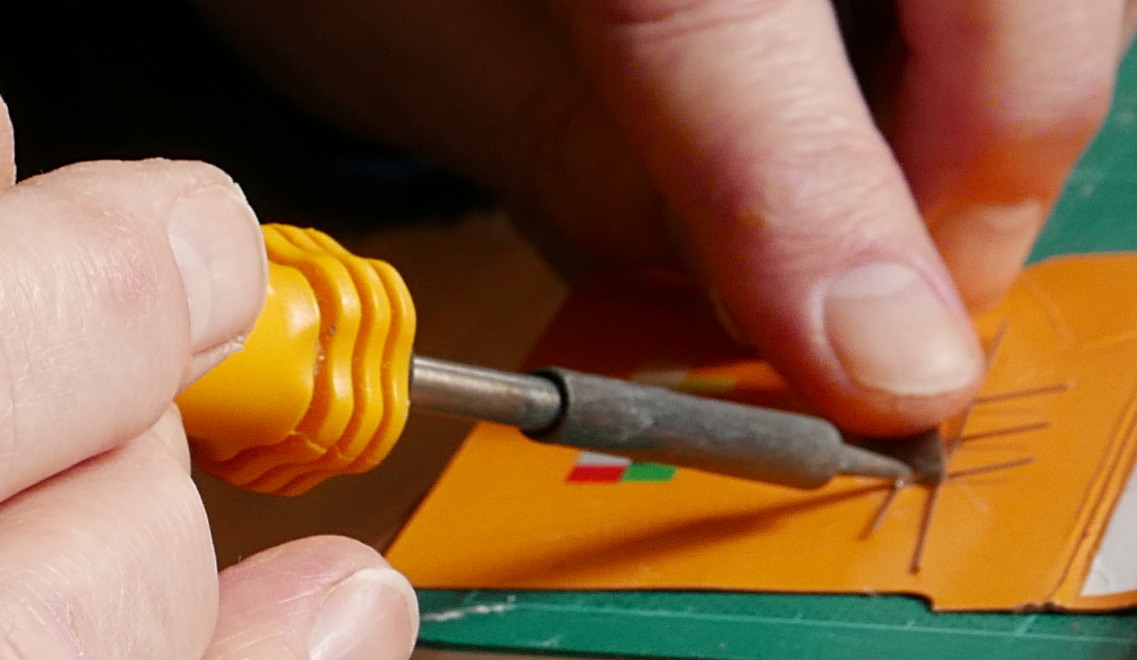
Small pieces were chopped from a length of solder, the junctions were fluxed, then the posts were tacked in place on the middle fence rail. No need to be too tidy at this stage.


The posts were now trimmed with the scalpel to be just short of the other groove, into which the top rail was then taped. The top rail junctions were fluxed and soldered in turn. Again, no need to make perfect joints - the idea is to get a roughly-accurate structure with enough strength to be handled. The tape was eased gently away with a scalpel blade and the blobby but square fence was transferred from the aluminium jig (which sinks too much heat to allow nice joins) onto a piece of card.


Now the joints were fluxed and worked over again with the iron, pressed down with a tool with a slight "click" being felt as the wire finds the notch. Care is taken to keep the joints as neat as possible.


Finally the emery board was used again to reduce any remaining large blobs and generally tidy up. The resulting fence can be inserted into its base by drilling holes for the posts; not all posts need to be "planted", it works well to plant every second or third one and trim the intermediate posts to size.

For the ladders, lengths of wire were squared off using a couple of strokes of an emery board on one side, turning over and repeating, then treating the remaining two sides: by no means perfect, but a few seconds' work produced a visibly squarer result. These were to be the ladder rails.


A single strand from a length of multistrand flex was gently straightened to be used as rungs. The jig this time was a 4mm strip of copperclad paxolin, a remnant from turnout construction in P4 days. The copper was eased away from the edges with by scraping with a scalpel, then slots for the rungs were scrawked in precise positions using a 1:10 slide board of the type written up by Geoff Jones in the 2mmSA magazine some years back.


The fine wire was now wrapped tightly round the paxolin strip and teased into place in the slots, then pressed down firmly with the rounded handle of a tool.


The rails were tacked at one end with solder then fluxed and held taut while working down the edges with a hot iron.


The hot tape is deployed again.


Blob size is less important than strength here. Any very large blobs are cleaned up with a touch from the iron, but the idea is to get a convincing impression at normal viewing distance rather than aiming at etch-precise ladder rungs.


The whole thing is then cleaned up with the emery board, the fine wire at the back of the jig is cut off with a sharp scalpel blade, and the ladder eased off the jig.


The sharp scalpel is used to trim any stray wires:


and finally a handrail can be added if required.


It looks convincing when placed against a filter bed, even without being tidied up further.


A quick look at some of the structures in the sewage works, still far from complete.


The valve hand-wheels in fact started life as wagon wheels from an N Brass narrow-gauge etched kit. The ladder in the shot below is an etch from a signal kit.


The safety chains across the fence openings are more pieces of fine copper wire.

That all took much longer to write than Alisdair took to do his demo. And then he whipped up bacon rolls, tea and coffee for his audience. We were duly impressed.

The rest of the afternoon was spent assembling and cleaning Sauchenford, then checking operation and making a list of the inevitable maintenance jobs which seem to sprout whenever a layout is left to its own devices for a few weeks.

Next month we'll be back in Edinburgh if all goes to plan, and before that we'll be manning the 2mmSA Roadshow stand at Model Rail Scotland. Do drop by to say hello if you're visiting the exhibition.


Sunday, 14 January 2018

January 2018 meeting

An Edinburgh meeting to start 2018 - with a good attendance: Jim, Stephen, Alisdair, Alistair, Chris, Nigel and Graham. Obviously, New Year resolutions were still in the forefront of many minds, because there was relatively little nattering and an air of serious industry was established fairly early on. Nigel has been dropping hints about a wee layout for his wee diesels (well, ok, he has not really started to sprinkle Scotticisms in his daily speech since he moved north of the Border, but that is surely just a matter of time). Anyway, giving substance to the layout rumour, there he was, filing up crossings for points, using his handy Eclipse instrument vice:


Here's a closer view of the vice.


A nice piece of kit, apparently no longer made. When Nigel quietly dropped in the information that his example was a skip rescue, you could hear the grinding of canny Scots teeth a block away.

Nigel's evangelical zeal, however, was reserved for Polycell Advanced Quick Drying Pollyfilla. (Other brands exist, but this formulation seems to work well for 2mm needs). This stuff is available in a tube for a fiver or a small drum for £8, and is a very versatile medium for modelling stonework for buildings or walls. It's quick to mix, easy to butter onto a piece of card or styrene using a scraper, and the result is flexible when dry, yet easily scribed to give crisp stone course detail, and readily sanded or distressed with a toothbrush (an old toothbrush, I hope) to soften sharp edges.


Unlike conventional fillers, it doesn't need to be built up in thin layers, and it readily bonds to itself so that mistakes can be corrected. The material can be cast (mould and clingfilm) and the finished result can be cut cleanly with a craft knife - the coping stones on this section of wall were produced by slicing up another piece of dried filler.


It takes water-based paints readily - Nigel was wielding a small tester pot of grey from the decorating shelves of a DIY warehouse.

Alisdair was working on his sewage farm, cursing the railings as far as I could make out. It is apparently a bit fiddly.

Jim meanwhile has painted his signalbox (see the November and December blogs). His own account is on RMWeb. A few more shots won't hurt however. The interior has all the necessary details, flags, duster draped over a lever, block instruments ... it's not clear if the flags can be unfurled though.


A fire hisses gently in the grate, with the tick of the clock the only other thing to break the silence. The signalman has gone out for a minute to ask what happened to his roof.


Ah, there it is. A couple of exterior views for good measure:


Stephen, as well as carrying out his self-alloted role of group librarian, was busy with squared paper designing a layout for his layout room. We recall he went through this stage before when the layout room was freshly made and the venue for a memorable housewarming. Then the inevitable happened, and his family filled the room with junk when he was off earning a living. (This seemed a familiar scenario to most of us at the meeting). Clearly, his New Year resolution is to fight back and reclaim his space. We will see! but we are with him in spirit.


Chris had come armed his 4F chassis, aiming to get the group's advice on the next stage. The classic role of an area group - sharing knowledge.


Alisdair took on the role of chief adviser, but most others had an opinion as well.


Meanwhile Alistair was in Andy Warhol mode, making a perspective sketch from a rather nice looking prototype plan for a stone workshop building from the slate quarries of Easdale off the west coast of Scotland.


Whit! Haud on a wee minnit!  There were no slate quarries in Leith! Mearns has gone off message again, and that small urban terminus layout of his will never get finished at this rate. Or beyond the Templot stage for that matter. However, each to their own. We know better than to argue with him.

This month's lecture was an account of a steam preservation project in Kenya, presented by Graham. Brevity was not its main feature. The interested reader can learn more here.

Nigel had brought some excellent Seville Orange cake (thanks Carol) which followed soup and bacon rolls ... and endless tea and coffee. Some nattering did take place after all, and one subject for discussion was the 2mmSA Perth Supermeet on Saturday April 21st. Mark your diaries, and if necessary negotiate with your better halves, now, to avoid disappointment.

Next month's meeting will be on the 10th in Glasgow, and the Short Talk will be by Stephen, who as the only professional railwayman in the group will doubtless have something of interest to tell us. If you'd like to come along, let Alisdair know via  www.2mm.org.uk/contacts.

Saturday, 9 December 2017

December 2017 meeting

Simon, Jim, Stephen, Alistair and Graham met at Alisdair's house in Glasgow on a cold but bright day. Some of the keener group members had found time to advance their projects in the last month. Simon had worked on some Severn Models etches to good effect: a signalbox in a fetching shade of pinkish primer:


and a weighbridge and office:
Both were made up just for fun, with no particular plan to use them in a model.

Stephen had a Dave Bradwell J27 etch resurrected from his Round Tuit box of stalled projects ... it sits on a Bob Jones chassis which was too shy for a photo:
Jim's signalbox for Kirkallanmuir was shown in flat form in last month's thrilling blog entry. This month we got to see it in built-up form :

 and some of the interior detailing: the train register desk and chair:


Took him ages to make the overscale penny though.
The cunning jig to assemble the treads of the access stair was also on show. Here's a view from each side:

The stair treads are individually etched pieces with small tabs at each end. The slots along the bottom of the jig accept the treads, and are differently-sized: the width of the tab on one side, and the full tread width on the other. The distance between the sides of the jig is slightly less than the tread length.


The treads are fed in through the larger slots so that a tab locates in the smaller slot on the other side. The tab at the other end stands slightly proud of the jig. The treads are thus held firmly while a pre-assembled etch for the stringer with slots to receive the tread tabs and handrails attached is offered up, the treads teased into the slots, then soldered with the merest trace of solder paint and a quick dab of the iron. The assembly is gently extracted and placed in the open slots at the top of the jig, and the stringer and rails for the other side of the steps is soldered up in turn. Clever stuff, and the result is worth the trouble.

Time was pressing however so the models were tidied away and Alistair gave us a short treatise on creating a backscene. Larger scales, he told us, may be able to get away without a backscene in some cases, but in 2mm it is essential. It has to be removable so that it can be worked on easily if necessary. Some notions on how to arrange this were sketched out for us:


As for what material to us: decorator's lining paper seems promising but in practice absorbs large quantities of water and expands as it does so, making dimensional stability a problem. Artists customarily prepare paper by stretching it on a board (soaking it, wiping off the excess, then taping it firmly down to the board while at maximum state of expansion and leaving it to dry overnight) but this is impractical for very long strips of paper. Thick watercolour paper will not expand as much but is too expensive to use for large backscenes. Instead, thin white card (from an artists' supplier or even framer's offcuts), carefully butt-jointed with reinforcing strips glued behind was recommended, with white emulsion as a base coat and used to fill any tiny joint gaps by careful use of a spatula.

Artists' acrylic paint is Alistair's preferred medium, giving good colour depth and being easy to use if care is taken to prevent them drying out on the brush. No need to buy expensive individual tubes of artists' acrylic: the inexpensive sets available in WH Smith such as Windsor & Newton "Galena" or Daler-Rowney System 3 are perfectly adequate, with a good range of useful colours, and tube sizes more suited to 2mm work. The cheaper paint contains more filler and less pigment - which makes their colours less intense - but for backscene use, intensity is not the main consideration. It's worth buying a larger tube of white, since it will be used four times as much as the other colours. Dark colours tend all to look similar since they are close in tone. To achieve a clear differentiation, lighter tones work better.

The first question was how to deal with sky. Alistair showed us how to mix white with cerulian blue and a tiny touch of ultramarine to get a convincing shade. A grey sky is achieved by adding a touch of burnt sienna. Sky tone is lighter where it meets the horizon and deeper straight overhead. Work with a wide, flat brush to cover the paper quickly: keep water handy because the acrylic will dry our on the brush very rapidly.

Deep blues from different suppliers may not act the same way when diluted and spread out over an area - some may have a reddish tint; others greenish.

Like all water-based paints, acrylics' shade lightens slightly as the paint dries, so it is necessary to work slightly darker than the desired end result. The change is not very marked in acrylics and is really only an issue when trying to match an existing tone of dry paint on scenery. (Acrylics' use is of course  not restricted to backscenes: Jim told us how he now uses them exclusively for wagon lettering). An old trick is to hide the backscene/scenery join with a wall or trees.


Some colours are essential in the backscene artist's palette: white, and a dark and light yellow, red and blue respectively. Alistair mentioned titanium white, lemon yellow, cadmium yellow, cadmium red, alizarin crimson, ultramarine blue and cerulean blue. Some other harder-to-mix colours are convenient to have at hand: yellow ochre (especially for mixing to create grassy shades), burnt sienna, and a yellowish or bluish green.

For detail, a "rigger" brush, with long bristles to hold a decent load of paint, is a good choice. The name apparently derives from artists depicting the rigging of nineteenth-century ships.

The backscene should not impose itself. Detail should be minimal and tones muted - as exemplified by models such as Anthony Yeates' "Corrieshalloch" and taken even further in the monotone background of "Lighterman's Yard". True perspective often looks wrong in a backscene, since it can only be accurate from one viewpoint. Instead, parallel perspective is a better choice: not completely correct from any viewpoint, but adequately convincing from most.

A very useful talk - thanks Alistair. The bacon sandwiches were served up, the scones and mince pies were handed round. All disappeared quickly. Then some more detailing work was done on "Sauchenford" - adding the characteristic A-frame telegraph poles used on the main pole routes of the Caledonian Railway. These were made up by Alisdair from kebab skewers shaped to a taper in a minidrill using coarse sandpaper, with crossbars from Jim's etches:


It's interesting how much character it adds to a scene to have some tall verticals - telegraph poles and signals - alongside the railway.

I am always fascinated to see other modellers' toolboxes: here's a shot of Jim's travelling kit to close with, in a sturdy wooden box which apparently once held rolls of camera film.


Next month's meeting will be in Edinburgh, on January 13th. For a change, the talk will be about the prototype rather than modelling, specifically on the Kenyan metre gauge, and the revival of a 1920s Vulcan Foundry 4-8-0. New attendees are welcome, just let Alisdair know you're coming.

Saturday, 18 November 2017

November 2017 meeting

Alistair, Alisdair, Andy, Stephen, Jim, Graham and new boy Chris assembled in Edinburgh this month. The temperature left no doubt that it was November, but the sun was shining.

This month's talk was by Jim, who swapped his Swiss needle files for the computer variety, in order to explain the gentle art of designing etched kits to us. Jim has commercialised some of his designs through his Buchanan Kits label, but he also produces one-off models for his Kirkallanmuir layout using etches, which he prepares himself using AutoCAD.

First of all Jim took us through a brief description of the principles of etching. Rather than repeat this blow for blow, the interested reader is referred to Bob Jones' excellent etching treatise on the 2mmSA virtual area group website. You can't access the VAG? Join the 2mmSA and see what you're missing!

Jim has used both of the main UK photo-etch suppliers, PPD and PEC, each of which has its own advantages and disadvantages. PPD dip their etches, PEC spray; PPD use rolls of metal, PEC use flat sheets; PPD offer smaller minimum sizes and setup costs, PEC are cheaper pro rata in bulk. The differences were explained to us. Search the VAG for "Etchers Advice" to read a series of very useful reports from experienced etchers in February 2016.

 Jim had brought along his most recent etch design and the outome in 10-thou nickel-silver: £109 from PPD, who are very responsive: two weeks from artwork submission to give a quote for approval, with five working days quoted to make the etch (in fact the order turned up two days after payment). PEC are typically slower.

The artwork for the etch is displayed on the monitor, and the finished result is on the table. On the left is a signalbox for Kirkallanmuir; on the right, a Caledonian Railway brakevan. Odd spaces are filled in with useful parts like hurdles for loading cattle, telegraph pole crossbars, and so on.

"Etch that, Jimmy" ... a traditional Glasgow greeting.

Etching artwork consists of four congruent layers, controlling how the nickel-silver is cut by the chemical etchant: leave the metal as full thickness; half-etch from the front; half-etch from the back; or etched right through. Jim uses AutoCAD 2007 to prepare his artwork, with two added preliminary layers: 0 for an outline drawing of parts using a zero-thickness line; 1 for a construction view (just the outline of areas of etch which belong together, used for placing the designs compactly in the final sheet layout); then finally the four layers copying layer 0 and filling in its shapes by hatching, to tell the etcher what to do: 2 to show where metal should be etched right through; 3 for "etch from front"; 4 for "etch from back"; and 5 for "etch right through".  PPD and PEC use different conventions for whether black mean "etch through" or "full thickness". Personal preference for one or the other when drawing may therefore influence the choice of etcher. Another factor is the drawing format they will accept: PEC for example standardise on AutoCAD 2000.

Jim took us through the design of a wagon, starting by drawing the floor outline on layer 0 with zero-thickness lines spaced 0.15mm apart for planking, step-copied as an array to be over length then trimmed back. Next, the inner layer of the three-layer etch for a side is drawn, and mirrored over to the other side; then the outer layer similarly; then finally a strapping layer. Each side Z-folds together like a concertina, with fishtail hinges which are filed off after the layers are sweated together. Jim explained the difference between a fold (90 degrees) and a bend (180 degrees), and how to get the dimensions of these correct. Then the ends are added in the same way, and solebars, headstocks, axleguards, axleboxes, and end stanchions. Veritable origami in ten-thou metal sheet.

Other tricks of the trade included tab-and-slot design - the slot 0.1mm oversize,  the tab tapered to make fitting easier. Multilayer parts don't always fold perfectly so a little tolerance is a good idea: multilayer axlebox bearing holes slightly oversize, and more generous hole sizes on the inner layers of a multi-layer part. This also give somewhere for the solder to go. Bolthead relief on outer layers is best added by half-etching from the back, then pushing a needle through from the back to create a pimple. Small multilayer parts are much more easily manipulated if an etched handle is included, removed once the part is soldered in position. Fitting of parts like coupling hooks and brake levers is eased if a tiny step is designed in at the appropriate point so that they locate correctly on assembly, avoiding the need for a shaky hand to hold them in place while soldering and the consequent risk of a dry joint.

There were more words of wisdom and experience, but at that point I went off to prepare lunch. Jim had brought along his latest build of his own etches, in the elusive Dixon livery which was a very common, but little-photographed private owner livery around Glasgow. Usually a shot like this has to be excused with a  caption on the lines of a "cruel enlargement". Not necessary here: the closer you get, the better it looks.
After lunch everybody got their heads down for a bit of modelling, while Alistair invigilated, as befits a retired dominie. It was dark by the time we stopped for more discussion, tea, cake, then off home.


Quite a productive day for us all. Next month, we'll meet in Glasgow.